Github上配置
- xxx.github.io仓库内,找到issues-labels

2. 新建一个label

名字一定是gitalk
用来存放提交的评论
- 新建一个application授权
打开右上角头像,【Settings】->【Developer settings】->【OAuth Apps】->【New OAuth App】
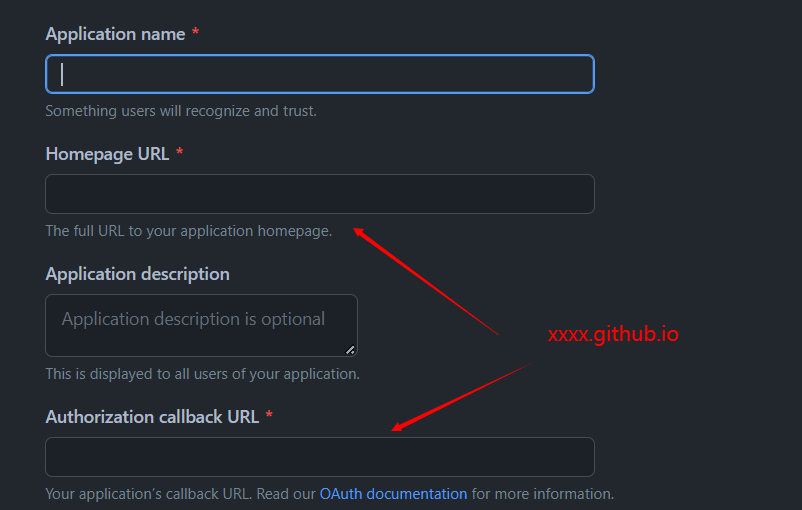
Homepage URL和Authorization callback URL
一定是xxxx.github.io ,其他的随便填。
复制下来生成的Client ID和Client secrets

主题中配置
- 配置文件_config.yml中的设置
1
2
3
4
5
6
7
8
9
10
11
12
13
14
15
| comment:
type: gitalk
gitalk:
enable: true 开启gitalk评论,不需要配置
owner: github用户名
admin: github用户名
repo: 博客的仓库名称(注意不是地址)
ClientID: 上面生成的Client ID
ClientSecret: 上面生成的Client Secret
labels: 'gitalk' github issue 对应的issue标签(上面新建的)
distractionFreeMode: true 无干扰模式,不需要更改
language: zh-CN
proxy: 'https://cors-anywhere.azm.workers.dev/https://github.com/login/oauth/access_token'
|
- 其他配置文件
在 【theme】->【pure】->【layout】->【_partial】->【post】文件夹中,新建gitalk.ejs
1
2
3
4
5
6
7
8
9
10
11
12
13
14
15
| <link rel="stylesheet" href="https://unpkg.com/gitalk@latest/dist/gitalk.css">
<script src="https://unpkg.com/gitalk@latest/dist/gitalk.min.js"></script>
<script src="https://priesttomb.github.io/js/md5.min.js"></script>
<script type="text/javascript">
new Gitalk({
clientID: '上述',
clientSecret: '上述',
repo: 'xxxx.github.io',
owner: 'xxxx',
admin: 'xxxx',
id: md5(location.pathname),
distractionFreeMode: true,
enable: true
}).render('gitalk-container')
</script>
|
在 【theme】->【pure】->【layout】->【_partial】下的article.ejs新增以下:(我报错enable是undefined,我直接把这个去掉了没想到也行)
1
2
3
4
5
| <% if (theme.gitalk.enable){ %>
<div id="gitalk-container"></div>
<%- include post/gitalk.ejs %>
<% } %>
|
- 运行
现在运行hexo s应该就可以了
第一次登陆需要授权,后续就不需要了
可能会出现443或者128错误,就配置上面的proxy
